Podman 創建容器除了使用預設的網路 (Bridge 模式) 之外,也可以透過創建自定義網路,使得容器網路可有效隔離或互相通聯。
1. Podman 網路簡介
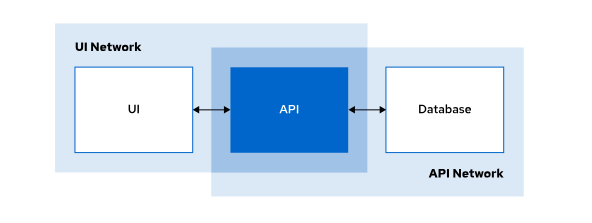
除預設網路之外,創建自定義網路,可以滿足更多需求,例如 : 將前端與 DB 分離,透過後端 API 中間座橋梁,可以限制前端應用容器能直接存取 DB ,必須要藉由後端所提供 API 才能執行限定功能增刪查找。
From redhat.com
預設網路停用 DNS 名稱解析功能,多容器使用建議以自定義網路或更進階創建 POD 來處理。
1
2
[ student@servera ~] $ podman inspect podman | grep dns
"dns_enabled" : false,
2. 管理 Podman 網路
2.1. 新增 Podman 網路
1
podman network create <NAME>
1
2
[ student@servera ~] $ podman network create nginx-lab
nginx-lab
2.2. 顯示所有網路列表
1
2
3
4
5
[ student@servera ~] $ podman network ls
NETWORK ID NAME DRIVER
de444a54efb2 nginx-lab bridge
2f259bab93aa podman bridge
[ student@servera ~] $
2.3. 顯示指定網路詳細資訊
1
podman network inspect <NAME>
 1
 2
 3
 4
 5
 6
 7
 8
 9
10
11
12
13
14
15
16
17
18
19
20
21
22
[ student@servera ~] $ podman network inspect nginx-lab
[
{
"name" : "nginx-lab" ,
"id" : "de444a54efb23ae31aa571e5410632ab3129df1847025fe8790c6d7b68378ade" ,
"driver" : "bridge" ,
"network_interface" : "cni-podman1" ,
"created" : "2023-07-21T22:18:42.91024454+08:00" ,
"subnets" : [
{
"subnet" : "10.89.0.0/24" ,
"gateway" : "10.89.0.1"
}
] ,
"ipv6_enabled" : false,
"internal" : false,
"dns_enabled" : false,
"ipam_options" : {
"driver" : "host-local"
}
}
]
2.4. 移除指定網路
1
podman network rm <NAME>
1
2
[ student@servera ~] $ podman network remove nginx-lab
nginx-lab
2.5. 移除未使用網路
 1
 2
 3
 4
 5
 6
 7
 8
 9
10
11
12
13
14
15
16
17
18
[ student@servera ~] $ podman network create lab-a
lab-a
[ student@servera ~] $ podman network create lab-b
lab-b
[ student@servera ~] $ podman network ls
NETWORK ID NAME DRIVER
1c327e55b394 lab-a bridge
89ddfaf4bce8 lab-b bridge
2f259bab93aa podman bridge
[ student@servera ~] $ podman network prune
WARNING! This will remove all networks not used by at least one container.
Are you sure you want to continue ? [ y/N] y
lab-a
lab-b
[ student@servera ~] $ podman network ls
NETWORK ID NAME DRIVER
2f259bab93aa podman bridge
[ student@servera ~] $
3. LAB - 存取容器網路服務
LAB 範例中會使用 quay.io/howtraining/<IMAGE> 中來當作範例,如沒有 Redhat 帳號也可以使用 docker.io/howtraining/<IMAGE> 來直接操作。
3.1 創建啟動 DNS 的網路
1
2
3
4
[ student@servera ~] $ podman network create nginx
nginx
[ student@servera ~] $ podman network inspect nginx | grep -i dns
"dns_enabled" : true,
3.2 啟動 Nginx 容器並綁定 Nginx 網路
1
2
3
[ student@servera ~] $ podman run --name nginx --net nginx --rm -d quay.io/howtraining/hello-world-nginx:latest
...output omitted...
669f0962
3.3 啟動 UBI 容器 ( 未綁定網路 ),並測試存取頁面
1
2
3
[ student@servera ~] $ podman run --name ubi8 -it --rm quay.io/howtraining/ubi8-minimal:8.8 curl http://nginx:8080
...output omitted...
curl: ( 6) Could not resolve host: nginx
3.4 啟動 UBI 容器綁定 Nginx 網路,並測試存取頁面
1
2
3
4
5
6
[ student@servera ~] $ podman run --name ubi8 -it --net nginx --rm quay.io/howtraining/ubi8-minimal:8.8 curl http://nginx:8080
<html>
<body>
<h1>Hello, world from nginx!</h1>
</body>
</html>
3.5 LAB 結束 - 清除資源
1
2
3
4
podman rm -f nginx
podman network rm nginx
podman rmi quay.io/howtraining/hello-world-nginx:latest
podman rmi quay.io/howtraining/ubi8-minimal:8.8
4. 小結
使用 Podman 創建 Network 能非常容易分離流量,使得更彈性的使用,自定義網路另外還具備更多進階的功能可以操作,指定子網路網段、DNS、GW 等等,可以透過 man 查閱更多功能。