目前任何操作都能透過瀏覽器在上面操作,無論是編輯影片、圖片甚至是寫文件等,故 Web 伺服器建立就十分重要,而 Apache HTTP 伺服器是一種很常用的選擇。
1. Apache HTTP 簡介
Apache HTTP 伺服器( 也被另外簡稱為 Apache ) 提供可以任意設定及具備高模組擴展性的 Web 伺服器,可以隨時將新的插件匯入至框架內,在 RHEL 中 Apache HTTP 伺服器均來自 AppStream 倉庫中的 httpd 套件。
2. 安裝及設定 httpd Web 伺服器
1
2
3
4
使用 Server C 為 httpd Server 範例:

    1. Server C 上執行 httpd ,並為 www-x.lab.example.com 網域提供服務來至 /srv/www-x.lab.example.com/www/ 其目錄內容 。
    2. 其他網域來至 /srv/default/www/ 期目錄內。
2.1. 安裝 http 套件
1
2
3
4
5
[ root@serverc ~] # yum install -y httpd | tail -n 4
mod_http2-1.15.7-5.module+el8.6.0+823+f143cee1.x86_64
rocky-logos-httpd-86.3-1.el8.noarch
Complete!
2.2. 創建 web 目錄及檔案
創建 /srv/default/www 與 /srv/www-x.lab.example.com/www 目錄。
1
[ root@serverc ~] # mkdir -p /srv/{default,www-x.lab.example.com}/www
創建 html 顯示內容 。
1
2
[ root@serverc ~] # echo "coming soon ...." > /srv/default/www/index.html
[ root@serverc ~] # echo "www-x" > /srv/www-x.lab.example.com/www/index.html
設定 SELinux Context,並載入使生效
1
2
3
4
5
6
7
8
[ root@serverc ~] # semanage fcontext -a -t httpd_sys_content_t '/srv(/.*)?'
[ root@serverc ~] # restorecon -Rv /srv/
Relabeled /srv/default from unconfined_u:object_r:var_t:s0 to unconfined_u:object_r:httpd_sys_content_t:s0
Relabeled /srv/default/www from unconfined_u:object_r:var_t:s0 to unconfined_u:object_r:httpd_sys_content_t:s0
Relabeled /srv/default/www/index.html from unconfined_u:object_r:var_t:s0 to unconfined_u:object_r:httpd_sys_content_t:s0
Relabeled /srv/www-x.lab.example.com from unconfined_u:object_r:var_t:s0 to unconfined_u:object_r:httpd_sys_content_t:s0
Relabeled /srv/www-x.lab.example.com/www from unconfined_u:object_r:var_t:s0 to unconfined_u:object_r:httpd_sys_content_t:s0
Relabeled /srv/www-x.lab.example.com/www/index.html from unconfined_u:object_r:var_t:s0 to unconfined_u:object_r:httpd_sys_content_t:s0
2.3. 設定 default 預設虛擬主機
1
2
3
1. 設定監聽任何進來的 80 port 預設至 /srv/default/www 目錄 。
2. 客製化 log 均會輸出至 default-vhost.log 內 。
3. 允許任何請求都能存取 /srv/default/www 目錄 。
1
2
3
4
5
6
7
8
9
[ root@serverc ~] # cat > /etc/httpd/conf.d/00-default-vhost.conf << EOF
<VirtualHost _default_:80>
DocumentRoot /srv/default/www
CustomLog "logs/default-vhost.log" combined
</VirtualHost>
<Directory /srv/default/www>
Require all granted
</Directory>
EOF
預設設定檔為 /etc/httpd/conf/httpd.conf ,非特定需求的無須直接修改,將所需的虛擬主機均定義在 /etc/httpd/conf.d/<name>.conf 便能方便管理及增修。
1
2
3
1. 設定監聽任何進來的 80 port ,並由網域名稱 www-x.lab.example.com 或 www-x 進來的流量導入至 /srv/www-x.lab.example.com/www 目錄。
2. 客製化 log 均會輸出至 www-x.lab.example.com.log 內 。
3. 准許符合上訴條件的流量可以存取 /srv/www-x.lab.example.com/www 目錄 。
 1
 2
 3
 4
 5
 6
 7
 8
 9
10
11
[ root@serverc ~] # cat >> /etc/httpd/conf.d/00-default-vhost.conf << EOF
<VirtualHost *:80>
ServerName www-x.lab.example.com
ServerAlias www-x
DocumentRoot /srv/www-x.lab.example.com/www
CustomLog "logs/www-x.lab.example.com.log" combined
<Directory /srv/www-x.lab.example.com/www>
Require all granted
</Directory>
</VirtualHost>
EOF
常用的虛擬主機分為三種 :
網址名稱對應(Name-based) : 透過 Client 所提供的網路來決定對應的服務,可以有效減少 IP 或是 port 占用,需要具備 DNS 伺服器或是靜態名稱解析達成。
IP位址對應(IP-based) : 透過單個伺服器上多張網路卡,藉由不同的 IP 對應到不同的服務上
Port埠號對應(Port-based) : 在單個伺服器僅有一張網路卡限制,使用不同的 port 號來對應不同的主機。
2.5. 啟動伺服器及開放防火牆規則
1
2
3
4
5
6
[ root@serverc ~] # systemctl enable --now httpd
Created symlink /etc/systemd/system/multi-user.target.wants/httpd.service → /usr/lib/systemd/system/httpd.service.
[ root@serverc ~] # firewall-cmd --permanent --add-service=http
success
[ root@serverc ~] # firewall-cmd --reload
success
3. Client 存取 Web 伺服器
3.1. 設定靜態解析
1
2
3
4
[ root@serverd ~] # cat >> /etc/hosts << EOF
172.25.250.13 www-x.lab.example.com
172.25.250.13 www-x
EOF
1
2
3
4
[ root@serverd ~] # curl http://www-x.lab.example.com
www-x
[ root@serverd ~] # curl http://www-x
www-x
3.3. 測試其他任意方式存取
1
2
3
4
[ root@serverd ~] # curl http://serverc.lab.example.com
coming soon ....
[ root@serverd ~] # curl http://172.25.250.13
coming soon ....
囿於僅開放 www-x 及 www-x.lab.example.com 可以存取到正式的頁面,其他的流量均只能至 default 頁面。
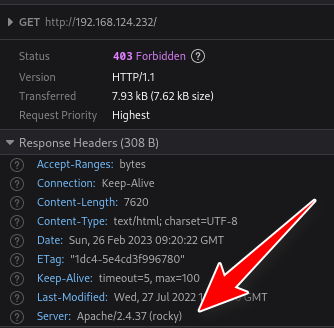
4. 資安弱掃 Issue
預設 httpd 會顯示其執行的作業系統及套件版本,這就可能遭受有心人士針對其 OS 套件的版本進行弱點功能,為了安全起見務必將此影藏起來。
Response Headers
1
2
3
4
5
6
7
# 添加下方參數
[ root@serverc ~] # cat >> /etc/httpd/conf/httpd.conf <<EOF
ServerSignature Off
ServerTokens howhow-lab
EOF
# 重啟 httpd
[ root@serverc ~] # systemctl restart httpd
5. 小結
Apache HTTP 伺服器設定非常容易,除了網頁伺服器外也可以當內部 yum 套件鏡像倉庫供私人環境使用。