Contents

Openshift - 初次部屬 App 應用程式

部屬一個雲平台的 App 應用程式在 OpenShift 是非常容易達成的,除了最平易近人的 Web Console GUI 之外還能透過 oc cli 指令來達成部屬。

1. Web Console 方式部屬

初學請先使用 kubeadmin 最高 Cluster 管理員帳號登入,後續進階會學習到 identity provider 設定 Oauth custer resource(CR)及 RBAC 權限管理後可以更細粒度操作。

單機版範例
此文章使用的為單機版 Openshift,此版本僅供測試與學習使用。 安裝啟用方式可以參考 HowHow 文章 單機版時常出現錯誤或是較慢是很正常的…有時需要耐心等待一下,正常 Cluster 創建需要較大的計算資源池才能執行及部屬。
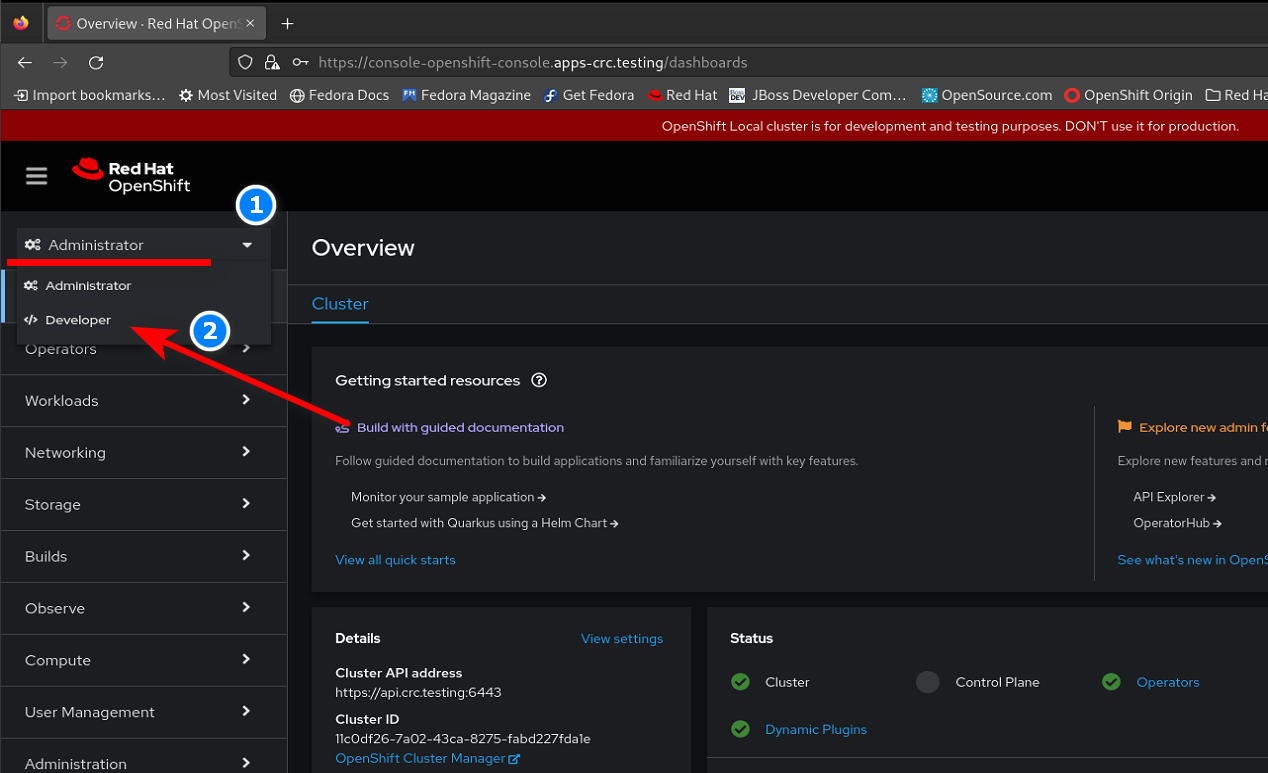
  1. 登入頁面後選擇 Administrator 下拉選單後點擊 Developer。

https://hackmd.io/_uploads/SJM3T2ypo.png
OpenShift 首頁

Tip
OpenShift Web Console 會依據瀏覽器語言設定顯示語言,建議點擊右上角帳號變更語言成英文。
  1. 進入 Developer 頁面後,點擊創建 Project。

https://hackmd.io/_uploads/BJl-kpJai.png
Developer 頁面

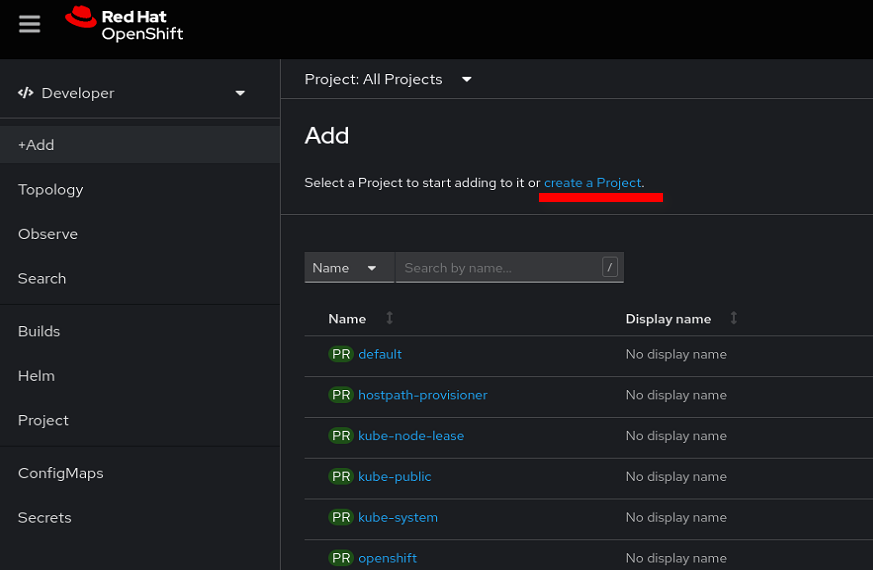
  1. Project 取名為 lab01 後,點擊創建

https://hackmd.io/_uploads/SJp7yp1pj.png
創建 Project

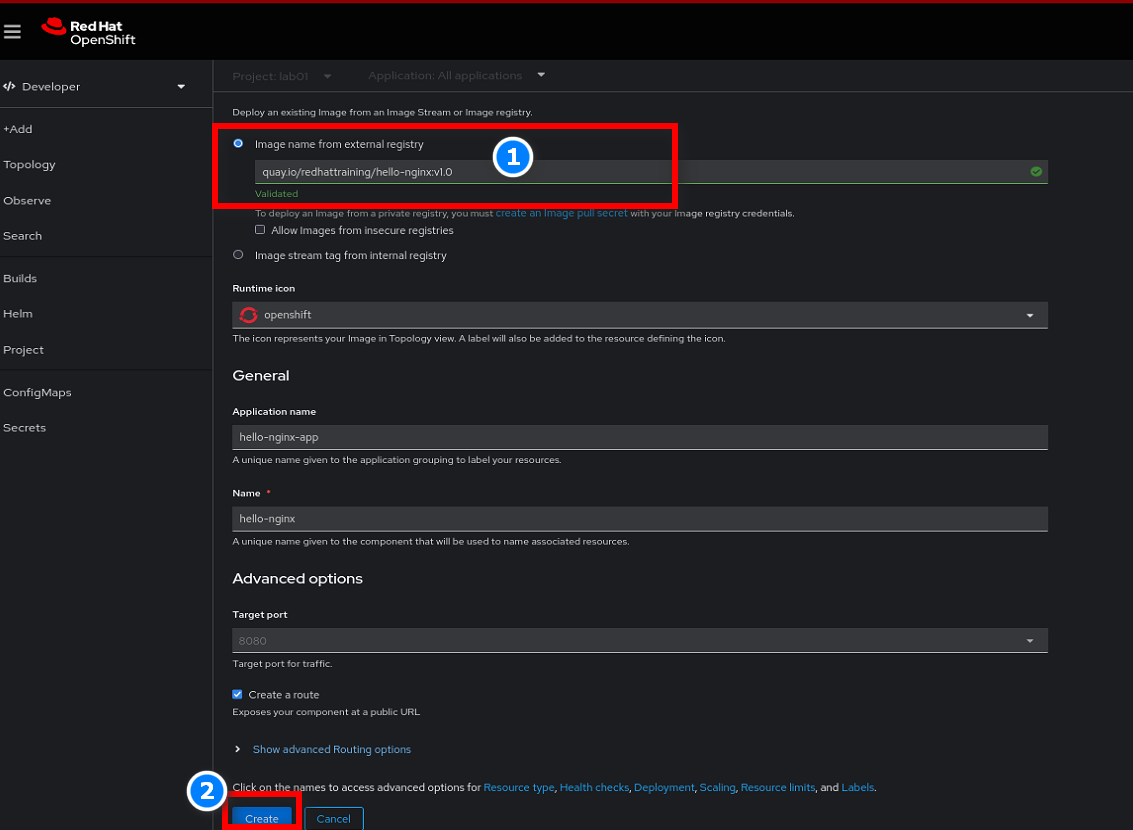
  1. 確認目前項目為 lab01 後,點擊 Container Images。

https://hackmd.io/_uploads/SkLeM616i.png
新增 APP 應用

  1. 輸入 Image -> quay.io/redhattraining/hello-nginx:v1.0 ,點擊創建 (其他參數與值使用自動生成即可)。

https://hackmd.io/_uploads/ryRSNTyaj.png
創建 APP 應用

與 Docker Hub Image 差異
不使用 Docker Official Nginx Image 是因為 SCC(Security Context Constraints) 會導致要額外設定,後續進階後續進階會學習到。
  1. 創建後會在拓譜圖中顯示其應用,點擊應用等待下載Image及自動部屬數分鐘( Pod 狀態為 Running)後即可點擊 URL 。

https://hackmd.io/_uploads/HywIBakaj.png
查看 Nginx Resources

  1. Openshift 會自動攜帶憑證的 https 入口的 Nginx 服務。

https://hackmd.io/_uploads/BJzcIa16i.png
顯示 Nginx 頁面

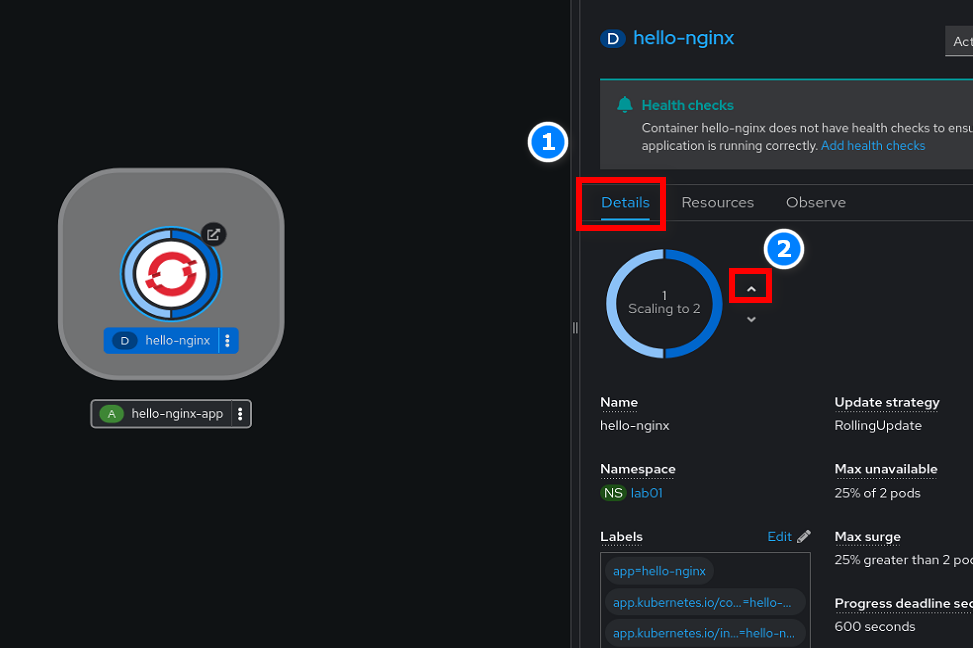
  1. 回到 Web Console ,點擊 Details 可以手動調整所需應用的副本數量,新增或是減少都行。

https://hackmd.io/_uploads/S1KSXJx6o.png
查看 Nginx Details

2. CLI 指令方式部屬

  1. 使用 kubeadmin 叢集管理員登入
1
2
3
4
5
6
7
8
[redhat@howhow-pc ~]$ oc login -u kubeadmin
Authentication required for https://api.crc.testing:6443 (openshift)
Console URL: https://api.crc.testing:6443/console
Username: kubeadmin
Password:
Login successful.
...output omitted...
Using project "default".
  1. 創建新 Project 為 lab02
1
2
3
[redhat@howhow-pc ~]$ oc new-project lab02
Now using project "lab02" on server "https://api.crc.testing:6443".
...output omitted...
  1. 將目前 Project 切換成 lab02
1
2
[redhat@howhow-pc ~]$ oc project lab02
Already on project "lab02" on server "https://api.crc.testing:6443".
Namespaces
OpenShift 的 Project 背後基底就是 K8s 的 Namespaces 的物件,在操作 k8s 不同項目物件時需要帶上 -n 參數,OpenShift 在此做了延伸的操作,切換 Projects 就類似於 kubectl config set-context –current –namespace=lab02
  1. 創建名為 hello-nginx 應用程式,並使用 quay.io/redhattraining/hello-nginx:v1.0 Image。`
1
2
3
4
5
6
7
[redhat@howhow-pc ~]$ oc new-app --name hello-nginx quay.io/redhattraining/hello-nginx:v1.0
--> Found container image c9bd055 (3 years old) from quay.io for "quay.io/redhattraining/hello-nginx:v1.0"
...output omitted...
    deployment.apps "hello-nginx" created
    service "hello-nginx" created
--> Success
...output omitted...
new-app
OpenShift 的 new-app 並不一個物件,背後其實是自動做了很多事情,自動創建 Deployment、Svc、Imagestream ( OCP 特有的)物件。
  1. 創建攜帶 OpenShift 自簽的萬用憑證路由,並映射其應用之 SVC。
1
2
[redhat@howhow-pc ~]$ oc create route edge hello-nginx --service hello-nginx
route.route.openshift.io/hello-nginx created
  1. 查看路由網址
1
2
3
[redhat@howhow-pc ~]$ oc get route
NAME          HOST/PORT                            PATH   SERVICES      PORT       TERMINATION   WILDCARD
hello-nginx   hello-nginx-lab02.apps-crc.testing          hello-nginx   8080-tcp   edge          None
Route
自動生成的 host name 其實就是 Deploy 物件 + NS 物件 + Cluster 所組成,當然也可以自定義所要的名稱。
  1. 使用 Curl 查看其應用網頁
1
2
3
4
5
6
[redhat@howhow-pc ~]$ curl -ks https://hello-nginx-lab02.apps-crc.testing
<html>
  <body>
    <h1>Hello, world from nginx!</h1>
  </body>
</html>
  1. 手動擴展應用的副本數
1
2
3
4
5
6
7
[redhat@howhow-pc ~]$ oc scale deploy hello-nginx --replicas 2
deployment.apps/hello-nginx scaled

[redhat@howhow-pc ~]$ oc get po
NAME                           READY   STATUS              RESTARTS   AGE
hello-nginx-77f8c86446-pc6tf   1/1     Running             0          45s
hello-nginx-77f8c86446-pf2qq   0/1     ContainerCreating   0          13s

3. 小結

OpenShift Paas 其實是非常強大,對於 Developer 可以不用去在乎底層 Infrastructure,專心於程式部屬,在 Web Console 介面上就能產生所需對應的基礎設施,對於 Infra 管理者所要學習的課程就是很大的一門學問了。


如果你還沒有註冊 Like Coin,你可以在文章最下方看到 Like 的按鈕,點下去後即可申請帳號,透過申請帳號後可以幫我的文章按下 Like,而 Like 最多可以點五次,而你不用付出任何一塊錢,就能給我寫這篇文章的最大的回饋!