Quay 本地私有化的 Image Registry 無論是儲存、管理、維護都具備高彈性,除了常見的公共的 Image Registry 要設定私人倉庫都是有限制且在免費版帳號有流量限制等因數,本地倉庫就是在大量存取且企業內部使用最佳選擇。
1. Quay 簡介
Quay 與 Harbor 都是企業上選擇的私有化 Registry 倉庫,Redhat 的 Quay 具備下列功能 :
Image 儲存
異地複製
企業身分驗證
標籤管理
自動排程移除過期 Image
Image 弱點掃描
事件通知
官方介紹 Project Quay
Community Central: Container Registries: Then and Now
VIDEO
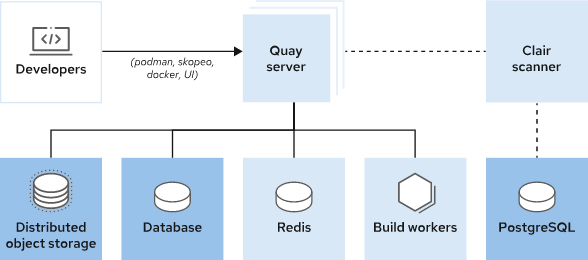
2. Quay 架構組成
Quay -> Image Registry 主要主件 。
Clair (可選) -> Image 弱點掃描。
Database (Mysql or Postgres) -> 儲存 Matedata 資訊。
Redis -> 提供 Web UI 介面快取 。
儲存 -> Production 要求必須使用 Object 儲存 (S3, Ceph RADOS, OpenStack Swift 等),單機可以選擇本地儲存。
From access.redhat.com
2.1. 單機版 Quay 資源要求
CPU : 2 Cores (含)以上
Memory : 4GB (含)以上
Disk : 30 GB (含)以上
DNS 名稱解析或是 /etc/hosts 靜態解析
請先至 registry.redhat.io 註冊紅帽試用帳號或是具備開者者帳號,如果沒有 Redis 與 Postgresql 可以使用 Docker Hub 上面的 Image 來更換。
3. 安裝步驟
以 RHEL8 為例
3.1. Podman 安裝及登陸
安裝 Podman 及 工具
1
2
sudo yum install - y podman
sudo yum module install - y container - tools
登入 registry.redhat.io
1
podman login registry.redhat.io
如沒有 registry.redhat.io 可以登入 quay.io 非官方的倉庫使用 (任何人都可以免費註冊) 。
3.2. 設定防火牆規則
開放 Web 介面、Postgres 與 Redis 防火牆規則
1
2
3
4
5
firewall-cmd --permanent --add-port=80/tcp
firewall-cmd --permanent --add-port=443/tcp
firewall-cmd --permanent --add-port=5432/tcp
firewall-cmd --permanent --add-port=6379/tcp
firewall-cmd --reload
3.3. 設定儲存路徑
以 /data 路徑為例
1
2
mkdir -p /data
export QUAY=/data
3.4. 設定 Postgres
建立資料夾與設定權限
1
2
mkdir -p $QUAY/postgres-quay
setfacl -m u:26:-wx $QUAY/postgres-quay
3.5. 啟動 Postgres
1
2
3
4
5
6
7
8
podman run -d --rm --name postgresql-quay \
  -e POSTGRESQL_USER=quayuser \
  -e POSTGRESQL_PASSWORD=quaypass \
  -e POSTGRESQL_DATABASE=quay \
  -e POSTGRESQL_ADMIN_PASSWORD=adminpass \
  -p 5432:5432 \
  -v $QUAY/postgres-quay:/var/lib/pgsql/data:Z \
  registry.redhat.io/rhel8/postgresql-13:1-109
將 Image 來源改為 docker.io/library/postgres:13.1 。
3.6. 啟用 pg_trgm 模組
1
podman exec -it postgresql-quay /bin/bash -c 'echo "CREATE EXTENSION IF NOT EXISTS pg_trgm" | psql -d quay -U postgres'
3.7 啟用 Redis
1
2
3
4
podman run -d --rm --name redis \
-p 6379:6379 \
-e REDIS_PASSWORD=strongpassword \
registry.redhat.io/rhel8/redis-6:1-110
將 Image 來源改為 docker.io/library/redis:6-alpine3.14 。
3.8 透過 Web UI 設定 Quay 參數
host 主機以 registry.lab.example.com 為例
啟用設定 QUAY 工具
1
podman run --rm -it --name quay_config -p 80:8080 -p 443:8443 registry.redhat.io/quay/quay-rhel8:v3.8.5 config secret
將 Image 來源改為 quay.io/projectquay/quay:v3.8.5 。
透過瀏覽器登入http://registry.lab.example.com 頁面,帳號為 : quayconfig , 密碼為 : secret 。
基本必須要設定參數 :
Server Hostname : 為主機解析名稱。
Database :
Type : Postgres
Server : registry.lab.example.com:5432
Username : quayuser
Password : quaypass
DB Name : quay
Redis :
Hostname: registry.lab.example.com
Port : 6379
Password: strongpassword
透過頁面最下方的驗證設定無誤後,即可下載設定檔,並將下載後的設定檔上傳至 host 內。
3.9 部屬 Quay
創建 config 目錄及本地 Image 儲存目錄,及設定權限。
1
2
mkdir $QUAY/{config,storage}
setfacl -m u:1001:-wx $QUAY/storage
將下載的設定檔 (quay-config.tar.gz )複製至 $QUAY/config 目錄內,並在$QUAY/config 內解開tar 壓縮。
啟動 Quay
1
2
3
4
5
podman run -d --rm -p 80:8080 -p 443:8443  \
   --name=quay \
   -v $QUAY/config:/conf/stack:Z \
   -v $QUAY/storage:/datastorage:Z \
   registry.redhat.io/quay/quay-rhel8:v3.8.5
將 Image 來源改為 quay.io/projectquay/quay:v3.8.5 。
透過瀏覽器登入頁面registry.lab.example.com,並創建使用者。
登入頁面
測試 Podman CLI 登入及 Web 介面
1
2
3
4
[root@howhow-pc ~]# podman login --tls-verify=false registry.lab.example.com
Username: example
Password:
Login Succeeded!
使用者畫面
4. 委由 systemd 管理
將容器透過 systemd 管理可以使容器退出自動重啟,且開機後能自行載入。
創建 systemd 服務
1
2
3
4
5
cd /etc/systemd/system
podman generate systemd --new --files --name redis
podman generate systemd --new --files --name postgresql-quay
podman generate systemd --new --files --name quay
systemctl daemon-reload
停止執行中的 podman
1
2
3
podman stop quay
podman stop redis
podman stop postgresql-quay
啟動服務並設定開機後自動載入
1
2
3
sudo systemctl enable --now container-redis.service
sudo systemctl enable --now container-postgresql-quay.service
sudo systemctl enable --now container-quay.service
5. 延伸 - 鏡像 OpenShift Image
Shell example
 1
 2
 3
 4
 5
 6
 7
 8
 9
10
11
12
13
14
15
16
cat > ocp412-mirror.sh << EOF
#!/bin/bash

export OCP_RELEASE="4.12.8-x86_64"
export LOCAL_REGISTRY='registry.lab.example.com'
export LOCAL_REPOSITORY='redhat123/ocp'
export PRODUCT_REPO='openshift-release-dev'
export LOCAL_SECRET_JSON='./pull-secret.json'
export RELEASE_NAME="ocp-release"

oc adm release mirror -a ${LOCAL_SECRET_JSON}   \
  --from=quay.io/${PRODUCT_REPO}/${RELEASE_NAME}:${OCP_RELEASE} \
  --to=${LOCAL_REGISTRY}/${LOCAL_REPOSITORY}   \
  --to-release-image=${LOCAL_REGISTRY}/${LOCAL_REPOSITORY}:${OCP_RELEASE} \
  --insecure
EOF
輸出 example
 1
 2
 3
 4
 5
 6
 7
 8
 9
10
11
12
13
14
15
16
17
18
19
20
21
22
23
24
25
26
27
28
29
30
31
...output omitted...
Success
Update image:  registry.lab.example.com/redhat123/ocp:4.12.8-x86_64
Mirror prefix: registry.lab.example.com/redhat123/ocp
Mirror prefix: registry.lab.example.com/redhat123/ocp:4.12.8-x86_64

To use the new mirrored repository to install, add the following section to the install-config.yaml:

imageContentSources:
- mirrors:
  - registry.lab.example.com/redhat123/ocp
  source: quay.io/openshift-release-dev/ocp-release
- mirrors:
  - registry.lab.example.com/redhat123/ocp
  source: quay.io/openshift-release-dev/ocp-v4.0-art-dev


To use the new mirrored repository for upgrades, use the following to create an ImageContentSourcePolicy:

apiVersion: operator.openshift.io/v1alpha1
kind: ImageContentSourcePolicy
metadata:
  name: example
spec:
  repositoryDigestMirrors:
  - mirrors:
    - registry.lab.example.com/redhat123/ocp
    source: quay.io/openshift-release-dev/ocp-release
  - mirrors:
    - registry.lab.example.com/redhat123/ocp
    source: quay.io/openshift-release-dev/ocp-v4.0-art-dev
鏡像 OCP Image
6. 小結
Quay 部屬十分的容易且快速,透過容器化方式能非常容易達成,如果要具備高可用性及擴展性,請務必創建多個 Quay 容器,必須使用 Object 物件做為高可用儲存媒介。